Tuesday, November 30, 2010

Double-Cheesy Baked Mac & Cheese

We are cheese fiends. All of us, well, with the exception of baby J who is too little to have cheese! Between my husband, our daughter and myself, we go through a ridiculous amount of cheese every week. And not just cheddar - our cheese drawer is filled with all kinds of cheesy deliciousness... brie, blue, gruyere, parmesan, chevre, asiago... at any given time we surely have at least a half dozen different cheeses in the fridge. Heck, we've even made homemade ricotta... but that's a post for another time!

This recipe came about as a way to use up a large assortment of small pieces of cheese, pieces that aren't quite enough to really do something with individually, but are still too delicious to waste. This is an easily-adapted recipe for whatever cheese you happen to have on hand, and despite the fact that cheese often doesn't freeze well, we have found that this recipe is great to freeze before baking. To reheat, simply place in a cool oven, set temperature and bake until bubbly and golden on top.

macandcheese

Double-Cheesy Baked Mac & Cheese

1 lb pasta, uncooked
1/4 cup butter
1/4 cup flour
1/2 tsp salt
1/4 tsp pepper
1/2 tsp ground mustard
1/2 tsp worcestershire sauce
2 cups milk
8 oz old cheddar, shredded
2 oz blue cheese
4 oz gruyere or emmenthal, shredded
5-6oz "other" cheese (edam, gouda, parmesan, fontina, brie, etc), hard cheeses shredded
1 medium onion, diced

Cook pasta in boiling salted water to al dente. Drain, rinse under cool water to halt cooking and reserve.

In a medium saucepan, melt butter over medium-high heat. When bubbly, whisk in flour, salt, pepper and mustard to create a roux. Cook for a minute or so, until golden, then whisk in worcestershire sauce and milk. Lower heat and continue stirring until thick.

Add cheddar and blue cheese to the sauce, as well as any other 'soft' cheeses (brie, chevre, etc). Stir until melted. Remove from heat.

In a large bowl, combine pasta, cheese sauce, additional shredded cheeses & onion. Pour into a greased 9x13 pan, or other large casserole. Bake at 350F until bubbly & golden, about 30 minutes.

Saturday, November 27, 2010

Pub-Style Chicken Wings

Wing night used to be a sacred ritual for my husband and I. Many years ago, when we lived even further up in the frosty north, we used to get together with friends every week and head down to a local pub for all the wings we could eat. Even after we moved away, we sought out local establishments for our regular wing fix. As we learned when I became pregnant with our first child, though, most places that have cheap wing nights are pubs or bars, and they are not exactly on the list of child-friendly dining locations. As a result, we rarely went out - cheap wing night isn't so cheap when you have to hire a babysitter, and neither of us really wanted to go without the other. And so, this recipe came about after several attempts to replicate that crispy, deep-fried pub wing experience that we missed so much. The best part about these wings is that the flavour is determined after they're cooked, so you can make several different flavours with no more inconvenience than a few extra dirty bowls.

And for those out there who are on a gluten-free diet and want to give these a try, substitute rice flour for regular flour, and the results are just as crispy and delicious. We have used this substitution for a friend with a wheat allergy, and couldn't tell the difference between the gluten-free version and our usual ones.

wingnite3

wingnite2

wingnite

Pub-Style Chicken Wings

4 lbs chicken wings, split and tips discarded
1 cup flour (or rice flour)
1 tbsp salt
1/2 tbsp pepper
1 tsp garlic powder
1/2 tsp paprika

Bring a large pot of water to boil. Drop in chicken wings (still frozen is fine), bring back to a boil, reduce heat and cook for 8 minutes. Drain and set aside.

Combine flour and seasonings in a large bowl. In small batches, dredge the cooked chicken wings in seasoned flour.

To bake the wings, place the dredged wings on a greased baking sheet. Spray all over with a cooking oil spray (like Pam) and bake at 425F until crispy and golden brown, about 30-40 minutes.

To fry the wings, heat a couple inches of a light oil (such as canola) to 375F in a wide, heavy-bottomed pot over medium-high heat, or use a deep-fryer set to 375F (or the closest setting). Fry the wings in small batches for 8-10 minutes, then skim them out and place them on a paper towel-lined baking sheet in a 200F oven to keep warm. Repeat with remaining wings.

For dry-seasoned wings (salt & pepper, lemon pepper, etc) - sprinkle the wings with a generous amount of your seasoning of choice. For saucy wings (hot, teriyaki, etc), place the wings in a bowl with a lid, add some sauce, cover and toss gently to coat.

Serve with ranch and/or blue cheese dressing for dipping!

Tuesday, November 23, 2010

Cream of Mushroom Soup

Yep, I'm on a soup kick. I love soup. I love creamy soups. I love brothy soups. I love meaty soups, and soups chock full of vegetables. Really, if it's soup, I will probably give it a try. And I especially love soup now that winter is in full swing here. With all the cold days we've had recently, it's so nice to have a pot of soup on for my husband when he gets home from work. I don't think he loved this one quite as much as I did, but I will admit to fully embracing the joy of cooking with fungus. He, on the other hand, is a little more wary of our little fungi friends, but is slowly coming around. This soup definitely gave him a greater appreciation for the depth of flavour that a bowl full of mushrooms has.

You can also used dried mushrooms in this, substituting 3oz of dried mushrooms for every pound of fresh called for in the recipe. Simply soak them in warm water for an hour beforehand. For extra flavour, run the soaking water through a fine-mesh sieve and substitute for some of the broth.

mushroomsoup

Cream of Mushroom Soup
(Adapted from Michael Smith's The Best of Chef At Home)

1/2 cup butter
1 lb button mushrooms
1 lb "other" mushrooms (I used shiitake & oyster)
2 medium onions, diced
salt & pepper
1 1/2 cups red wine
5 cups chicken or vegetable broth
1 cup heavy cream
1 1/2 tsp dried thyme
1 tsp dried rosemary
3 tbsp cornstarch
1/4 cup cold water

Place a large heavy-bottomed pot over medium heat. Add the butter, mushrooms and onions, season with a sprinkle of salt & pepper, and cook until mushrooms begin to brown.

Pour in red wine, and bring to a simmer. Let cook until wine has reduced by about two thirds, and is like a glaze on the mushrooms.

Stir in chicken broth, heavy cream and thyme, and return to a simmer.

Stir together cornstarch & cold water. Add slowly to the simmering soup, stirring while it returns to a simmer. If you prefer a thicker soup, add a little more cornstarch & water. If you like a smoother soup, puree all or part of the soup with an immersion blender.

Add salt & pepper to taste, and serve immediately.

Cream Of Mushroom Soup on FoodistaCream Of Mushroom Soup

Saturday, November 20, 2010

Westernized Bánh mì (Vietnamese Subs)

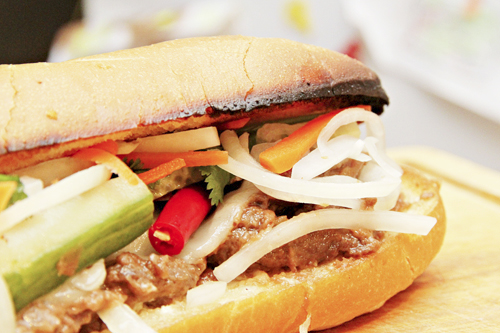
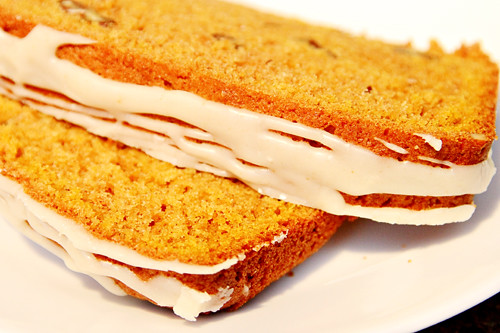
Several years ago, when my husband worked downtown, he used to go to this crazy little Vietnamese place for lunch all the time, and he raved about their sub sandwiches. Not loving the crazy spicy food, I avoided them until I noticed two restaurants near my office that served these, and both would have lines out the door, even in the dead of winter. I decided to join the masses, and ended up totally hooked on these delicious buns full of satay & vegetables. Now that I'm at home with the kids and my husband no longer works in the downtown core, we set out to figure out how to replicate these subs in our own kitchen, and I think we've come pretty close to the westernized versions that are readily available. It's probably not very authentic, but it's delicious nonetheless!

banhmi2

Westernized Bánh mì (Vietnamese Subs)
Adapted from Chowtown

4 6-8" sub buns
Mayonnaise
Satay beef, chicken or pork
Mozzarella cheese, sliced thin
1/2 of an english cucumber, sliced thin
1/2 a medium onion, sliced thin
Do Chua (pickled carrots & daikon), squeezed in a paper towel to remove excess liquid
Bunch of cilantro
12 fresh red Thai or bird chilis, stems removed
Sriracha hot sauce

Split sub buns and lay open on a baking sheet. Cover bottom portion with satay meat, and cover meat with mozzarella cheese. Place under broiler until bun is toasted and cheese is melty & bubbly.

Spread the top of the bun generously with mayonnaise, and fill with cucumber, onion, do chua, cilantro, and chilis, and finish with a squirt of sriracha. The chilis and sauce are hot, so if you prefer a milder version, feel free to leave them out.

Makes 4 6-8" subs.


Satay Beef, Chicken or Pork

4 tsp peanut oil
1 small onion, finely diced
4-6 cloves garlic, minced
1" piece of ginger, minced
1/3 cup peanut butter
1 cup coconut milk
2 tsp soy sauce
2 tbsp brown sugar
1 1/2 tbsp fish sauce
1 1/2 tbsp lime juice
2 tsp sambal oelek
1 pound thinly sliced beef, chicken or pork

Heat 2 tsp oil in a saucepan over medium heat. Add onion, garlic and ginger and saute until onion begins to brown.

Reduce heat to low, add remaining ingredients and simmer until thick, about 10 minutes. Taste, and add more sambal oelek if you like it spicier. Remove from heat and set aside.

In a large pan, heat another 2 tsp oil over medium heat. Add meat and cook until nicely browned. Add satay sauce, reduce heat and let simmer until the sauce is nice and thick. Remove meat from sauce with a slotted spoon and set aside.


Do Chua (Sweet Pickled Carrot & Daikon)

3/4 lb carrots, peeled & trimmed
3/4 lb daikon, peeled & trimmed
1 tsp salt
2 tsp + 1/2 cup sugar
1 1/4 cups rice vinegar
1 cup lukewarm water

Cut carrots & daikon into matchstick-sized pieces. Place in a bowl with salt and 2 tsp sugar. Knead gently for 3-4 minutes, until the carrots & daikon begin to release a significant amount of moisture and lose about a quarter of their volume.

Combine 1/2 cup sugar, vinegar and water in a bowl. Stir to dissolve sugar.

Rinse carrot & daikon under cool water in a colander, and gently press out excess moisture. Return to a bowl and pour the vinegar mixture over top. Let marinate a minimum of 1 hour, but this may be made ahead and refrigerated for up to a month.

Wednesday, November 17, 2010

Maple Pecan Pumpkin Loaf with Brown Butter Bourbon Glaze

I was digging around in the freezer and found a 2-cup package of frozen pumpkin puree left over from making pumpkin cheesecake a few weeks ago, and was inspired to find something new to do with it. I had been craving banana bread but had no bananas, so decided to see what I could do with pumpkin. And what better to add to the lovely fall flavour but maple syrup? This loaf is a little dense but has a lovely moist crumb. A glaze made with nutty brown butter and bourbon makes a perfect finishing touch.

maplepumpkinloaf3

maplepumpkinloaf

maplepumpkinloaf2

Maple Pecan Pumpkin Loaf with Brown Butter Bourbon Glaze

Loaves:
2 cups all purpose flour
1 cup whole wheat flour
2 tsp cinnamon
1 tsp nutmeg
1/2 tsp salt
1 tsp baking soda
1 tsp baking powder
1 cup butter, partially melted
1 cup brown sugar
1 1/4 cups white sugar
1/3 cup real maple syrup
3 eggs
2 cups pumpkin puree (1 15oz can)
1 cup coarsely chopped pecans

Glaze:
1/4 cup butter
1 1/2 cups icing sugar
2 tsp bourbon
2 tbsp milk

Preheat oven to 350F and grease two 9x5 loaf pans.

In a medium bowl, combine flours, cinnamon, nutmeg, salt, baking powder and baking soda. Set aside.

Microwave butter for a few seconds to partially melt it. Pour into the bowl of a stand mixer and cream with sugars, maple syrup and eggs. Stir in pumpkin.

Slowly add dry ingredients to the pumpkin mixture, stirring until just combined. Fold in pecans, and divide batter between the prepared loaf pans. Bake at 350F until a toothpick inserted in the middle comes out clean, about 45-50 minutes. Let cool in pan for 10 minutes, then remove to a wire rack.

To make the glaze, measure icing sugar into a medium bowl.

Hat butter in a small saucepan until bubbly and golden brown. Watch the butter closely and remove from heat when it's done, it goes from golden to burnt pretty quickly.

Pour butter over icing sugar, and add bourbon and milk. Stir until smooth, and drizzle over pumpkin loaves.

Makes 2 loaves.

Sunday, November 14, 2010

Smoky Black Bean & Sausage Soup

Cooking with dried beans has become my most recent kitchen obsession. They're cheaper than canned beans, less wasteful, and don't come laden with sodium. Cooking with dried beans takes a little more planning and effort than just opening a can and dumping it in the pot, but the results are tastier.

This soup is a lovely, meaty, hearty soup, perfect for a chilly day. It has a nice heat to it but isn't overwhelmingly spicy. According to my spice-loving husband, a dash of hot sauce makes it even better!


blackbeansoup

Smoky Black Bean & Sausage Soup
(adapted from my kitchen addiction)

1 pound dried black beans, soaked overnight and rinsed
1-2 tbsp extra virgin olive oil
10-12 ounces smoked sausage, diced (I used a moose salami for this)
1 medium onion, diced
1 large bell pepper, diced
1 small head garlic, minced
2 jalapeño peppers, seeded and minced
1 tbsp ground cumin
1 tbsp ancho chili powder
1 1/2 tsp Hungarian paprika
Splash of beer or white wine (optional)
6 cups chicken stock
Salt & pepper
Sour cream to garnish

Soak black beans overnight in a generous amount of water. Rinse and set aside.

Heat oil in a large heavy-bottomed pot over medium heat. Add onions, bell peppers and sausage, cook until soft, about 6-8 minutes. Add garlic & jalapeño, stir and cook for another 30 seconds. Add spices, stir to coat. Deglaze your pot with a generous splash of beer or white wine.

Pour in chicken stock & add beans. Bring to a boil, then reduce to a simmer and let cook over low heat for 1h 15m. Test beans for doneness, they should be soft but not falling apart. If they're not done, continue simmering for another 15 minutes or so, testing occasionally.

Partially blend with an immersion blender to thicken the soup. Season with salt & pepper to taste, and serve with a dollop of sour cream.

Serves 6-8

Thursday, November 11, 2010

Perfect Prime Rib

A well-cooked prime rib roast is, in my most humble opinion, one of the finest pieces of beef you will ever eat. It's hard to cook a truly bad prime rib, but it's so easy to cook an amazing one. This is not so much a recipe as it is a guideline - there are no fancy ingredients, no tricky techiques to master. All you really need is an oven and a whole lot of time. A high-heat start gives the roast a nice crisp outside, while roasting for the majority of the cooking time yields a lovely tender roast with an even doneness. Because roasts don't come in standard sizes, and oven temperatures may vary between models, it is absolutely vital to use a meat thermometer to determine when the roast is finished. This roast is best cooked to no more than medium, any more and it's really just a waste of this cut of meat.

perfectprimerib

Perfect Prime Rib

Prime rib roast of your desired size
Sea salt
Freshly cracked pepper
Herb rub of choice
2 carrots
1 large onion

When choosing a roast, a good guess is to estimate that you can feed 2 people per rib. A 3-rib roast would easily serve 6 adults. Ask your butcher for the 'small' end of the prime rib if you ca, but as I said above, a bad prime rib is hard to come by. I have cooked both ends and found that they're both delicious!

A couple hours before roasting, remove the roast from the fridge and allow it to come to room temperature. Rub the meat all over with herbs. My rub of choice consists of rosemary, thyme, sage, basil and oregano. You can use fresh if you'd like, but I keep this dried herb blend on hand for various seasoning purposes, and find it's perfect for this. Just before cooking, season with salt & pepper.

Preheat your oven to 450F. Scrub your carrots and remove the ends, no need to peel. Cut them into a couple large pieces. Trim & peel the onion, cut it into quarters. Scatter the carrot & onion pieces in the bottom of a roasting pan, and lay the roast, rib side down, on top of them. If you have a remote meat thermometer, now is a good time to place the probe in a good position to monitor the internal temperature.

Place the roast in the oven and roast at 450F for 15 minutes. Without opening the oven door, turn the oven down to 250F, and continue to roast for 20-25 minutes per pound, until the roast reaches an internal temperature of 130F for medium rare. If you like your meat done a little more, roast to 140F for medium.

When the roast is done, cover it with aluminum foil and a kitchen towel to allow it to rest. It's important to allow the roast to rest for at least 20-30 minutes before carving.

If a jus or gravy is your thing, move the roast to a board for carving. Remove the carrot & onion pieces from the pan, and heat the drippings over medium heat. Deglaze the pan with a splash of red wine and, if necessary, supplement the drippings with beef stock. For a thick gravy, bring to a simmer and thicken with a couple tablespoons of cornstarch dissolved in a bit of cold water. You may find, however, that this roast rarely releases enough drippings to make a jus or gravy without supplementation. This is not a bad thing, it just means all those delicious meaty juices are still inside your roast!

Sunday, November 7, 2010

Roasted Butternut Squash & Pear Soup

It's November, and fall always makes me think of warm, hearty, delicious comfort food. For me, there's nothing more comforting than a bowl of thick, creamy squash soup. I actually made this soup several weeks ago before the birth of my son. We enjoyed half the batch immediately, and froze a liter of it for a quick dinner after he was born. I am pleased to say that not only is this recipe fantastic right out of the pot, but it freezes beautifully. Simply freeze before adding cream, and when you want to enjoy it again, let it thaw, heat gently in a saucepan over medium heat, garnish and dig in!

roastedsquassoup

Roasted Butternut Squash & Pear Soup
(Adapted from The Gracious Bowl)

2 tbsp olive oil
1 large onion, diced
1 medium butternut squash, quartered and seeded
3 pears, peeled and chopped
1 tsp madras curry powder
1 tsp powdered ginger
1/2 tsp cinnamon
1/2 tsp salt
pepper to taste
2-3 cups chicken broth (or vegetable broth)
Cream, salt & pepper for garnish

Quarter and seed the squash, rub with olive oil, sprinkle with salt and pepper, and roast at 400 degrees until soft, about 30-40 minutes. Let cool and scoop out the flesh. Set aside.

Heat olive oil over medium heat. Saute the onion and pear until very soft, 6-8 minutes. Add the curry, cinnamon, and ginger and let them toast for a minute, then add the squash. Add the chicken broth, and simmer for another 10-15 minutes

Puree the soup in a blender in small batches, or with an immersion blender. If the soup seems too thick to puree well, add a little more broth to loosen it up. This is a pretty thick soup, so if you like it thinner, just add broth until it's the consistency you like.

Ladle into bowls, stir in cream (a tablespoon or two per bowl is good), garnish with salt & pepper, and enjoy!

Serves 4-6.
Related Posts Plugin for WordPress, Blogger...