Sunday, December 12, 2010

Guinness Cottage Pie

Growing up, shepherd's pie was one of those meals that my mom used to make on a regular basis. It was never one of my favourites, and after I moved out on my own, it took me over a decade to even want to give it a try again. My husband and I love casseroles, and we love things made with beer, so we decided to give this Gordon Ramsay recipe a go. Needless to say, my opinion of this dish has changed immensely! And something I did not know - shepherd's pie is made with lamb, and the same dish with beef is cottage pie. Interesting!

I adapted this recipe a little, to make it less meaty and to add some vegetables. The original is fabulous, but a one-dish meal that has vegetables other than potatoes is important for feeding my kids.

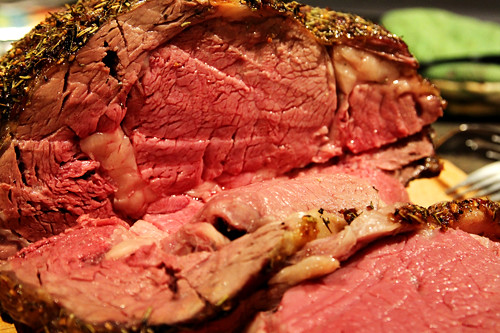
This recipe is also a great way to use leftover roast beef, diced into 1/2" cubes, instead of ground beef. Substitute about 2 cups of cooked roast beef for the ground beef. In addition, if you have leftover gravy, warm it up (with some water to thin it if necessary) and substitute for some of the chicken stock. This substitution may change the stovetop cooking time, so watch your pan accordingly.

cottagepie

Guinness Cottage Pie
(adapted from Gordon Ramsay's Great British Pub Food)

Olive oil
1 lb ground beef
salt and pepper
1/2 lb mushrooms, sliced
1 medium onion, diced
4 garlic cloves, minced
1 tsp dried thyme
2 plum tomatoes, chopped
2 tbsp tomato paste
1 bottle (341mL) Guinness
5 tbsp Worcestershire sauce
1 1/4 cup chicken stock
1 cup frozen corn kernels
1 cup frozen peas
2 lbs potatoes, peeled and cut into 1" cubes
3 tbsp butter
1/4 cup finely grated cheddar
1 egg yolk
2 tbsp parmesan cheese

In a large saute pan, heat 1 tbsp olive oil over medium heat. Add ground beef, season with salt and pepper, and cook until nicely browned. Remove from pan and drain excess fat. Set aside.

Add another tablespoon of oil to the pan and add sliced mushrooms. Shake pan so they are evenly distributed, reduce heat to medium and allow to cook 4-5 minutes without touching, until they are a nice golden brown underneath. Stir and continue to cook until mushrooms are nicely caramelized. Remove from pan & set aside.

Heat another tablespoon of oil, and cook onion until soft and beginning to brown. Add garlic and thyme, cook for another 30 seconds while stirring constantly to prevent burning. Add tomatoes, tomato paste & cooked ground beef, cook for 4-5 minutes, stirring constantly. Add Guinness and worcestershire sauce, simmer until liquid has reduced by half. Stir in chicken stock and let simmer until thick and glossy, about 25 minutes. Stir in corn, peas and reserved mushrooms. Remove from heat.

Cook potatoes in a pot of salted water until tender. Drain, return to pot and mash roughly with butter & cheddar cheese.

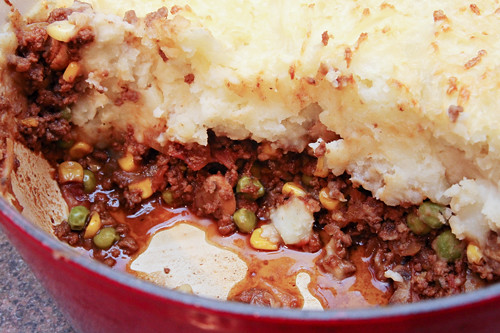
Spoon beef mixture into a 3-quart casserole dish. Top evenly with mashed potatoes, roughing up the top with a fork. Sprinkle parmesan cheese over top, and bake until golden brown and bubbly, about 30 minutes.

Serves 4-6

Wednesday, December 8, 2010

Maple Beer Ham with Sweet Hot Mustard

I realize that a lot of the recipes I post are not always the simplest meals, or the quickest to prepare. This one takes a long time to make, but most of that time is in a slow cooker! It's a great one to prep in the morning, or even the night before. The ham is absolutely delicious... it practically falls apart when it's done, and the maple & beer add a really amazing flavour to it. We make the biggest possible ham that will fit in our slow cooker, and use the leftovers to make ham sandwiches, or fry up some bigger chunks for a ham & egg breakfast. The sweet hot mustard is an adaptation of a recipe my grandmother passed on to me - mine's a bit spicier than hers is, though! It doesn't taste like much immediately, but develops a great flavour after a couple of hours.

maplebeerham

Maple Beer Ham with Sweet Hot Mustard

Ham:
One bone-in ham, 3-7lbs
1 large onion, sliced
1/2 cup maple syrup
1 tsp dry mustard
1 1/2 cups beer (nothing too pale or too dark, a nice medium brown beer is best)

Lay the sliced onions in the bottom of your slow cooker. Place the ham on top, season with salt & pepper.

In a bowl, whisk together maple syrup & mustard. Stir in beer, and pour over ham. Cook on low for 6-8 hours.


Sweet Hot Mustard:
1/2 cup flour
5 tbsp dry mustard
2/3 cup sugar
2 tsp salt
1/3 cup vinegar
2 tbsp water

Combine flour, mustard, sugar and salt in a bowl. Add vinegar and water, stirring into a smooth paste. Pour into a jar and refrigerate for a few hours or overnight before using.

Friday, December 3, 2010

Peanut Butter Caramel Squares

Peanut butter cups are one of my all-time favourite candies, and a close second are those delicious, chewy Kraft caramel squares. This recipe combines the best of both worlds - a sweet and peanut-buttery base, a smooth, soft caramel middle and a bit of chocolate on top. They're also sinfully addictive... I've been eating them by the fistful for days. Usually 'out of sight, out of mind' works for me, but even hiding them hasn't helped the rate at which they're being devoured!

I suggest keeping these refrigerated, as the caramel is quite soft at room temperature, and such a thick layer will tend to ooze a little. They look a little funky if that happens, but are no less delicious!

pbcaramel

Peanut Butter Caramel Squares

Peanut butter layer:
1 1/2 cups icing sugar, sifted
3/4 cup graham cracker crumbs
3/4 cup smooth peanut butter
1/2 cup butter

Caramel layer:
1/2 cup heavy cream
1/2 cup butter
1 1/2 cups brown sugar
1 tbsp water

Chocolate layer:
1 cup chocolate chips
1 tbsp butter

In a bowl, mix together icing sugar and graham cracker crumbs. Set aside.

In a small saucepan over medium heat, melt together butter and peanut butter. Pour into dry ingredients, and stir until the mixture comes together and forms a ball. Press into a parchment-lined 9x9 pan and set aside.

To make the caramel layer, combine cream, butter, sugar and water in a large saucepan over medium heat. Stir until mixture is smooth, then allow to boil untouched until it reaches 240F (soft ball stage) on a candy thermometer. Pour over peanut butter layer and let set for 20 minutes at room temperature, then place in the freezer for 10 minutes to firm up.

For the chocolate layer, melt together chocolate and butter in a heatproof bowl over a boiling water bath. Spread over chilled caramel and let cool before cutting into 1" squares.

Tuesday, November 30, 2010

Double-Cheesy Baked Mac & Cheese

We are cheese fiends. All of us, well, with the exception of baby J who is too little to have cheese! Between my husband, our daughter and myself, we go through a ridiculous amount of cheese every week. And not just cheddar - our cheese drawer is filled with all kinds of cheesy deliciousness... brie, blue, gruyere, parmesan, chevre, asiago... at any given time we surely have at least a half dozen different cheeses in the fridge. Heck, we've even made homemade ricotta... but that's a post for another time!

This recipe came about as a way to use up a large assortment of small pieces of cheese, pieces that aren't quite enough to really do something with individually, but are still too delicious to waste. This is an easily-adapted recipe for whatever cheese you happen to have on hand, and despite the fact that cheese often doesn't freeze well, we have found that this recipe is great to freeze before baking. To reheat, simply place in a cool oven, set temperature and bake until bubbly and golden on top.

macandcheese

Double-Cheesy Baked Mac & Cheese

1 lb pasta, uncooked
1/4 cup butter
1/4 cup flour
1/2 tsp salt
1/4 tsp pepper
1/2 tsp ground mustard
1/2 tsp worcestershire sauce
2 cups milk
8 oz old cheddar, shredded
2 oz blue cheese
4 oz gruyere or emmenthal, shredded
5-6oz "other" cheese (edam, gouda, parmesan, fontina, brie, etc), hard cheeses shredded
1 medium onion, diced

Cook pasta in boiling salted water to al dente. Drain, rinse under cool water to halt cooking and reserve.

In a medium saucepan, melt butter over medium-high heat. When bubbly, whisk in flour, salt, pepper and mustard to create a roux. Cook for a minute or so, until golden, then whisk in worcestershire sauce and milk. Lower heat and continue stirring until thick.

Add cheddar and blue cheese to the sauce, as well as any other 'soft' cheeses (brie, chevre, etc). Stir until melted. Remove from heat.

In a large bowl, combine pasta, cheese sauce, additional shredded cheeses & onion. Pour into a greased 9x13 pan, or other large casserole. Bake at 350F until bubbly & golden, about 30 minutes.

Saturday, November 27, 2010

Pub-Style Chicken Wings

Wing night used to be a sacred ritual for my husband and I. Many years ago, when we lived even further up in the frosty north, we used to get together with friends every week and head down to a local pub for all the wings we could eat. Even after we moved away, we sought out local establishments for our regular wing fix. As we learned when I became pregnant with our first child, though, most places that have cheap wing nights are pubs or bars, and they are not exactly on the list of child-friendly dining locations. As a result, we rarely went out - cheap wing night isn't so cheap when you have to hire a babysitter, and neither of us really wanted to go without the other. And so, this recipe came about after several attempts to replicate that crispy, deep-fried pub wing experience that we missed so much. The best part about these wings is that the flavour is determined after they're cooked, so you can make several different flavours with no more inconvenience than a few extra dirty bowls.

And for those out there who are on a gluten-free diet and want to give these a try, substitute rice flour for regular flour, and the results are just as crispy and delicious. We have used this substitution for a friend with a wheat allergy, and couldn't tell the difference between the gluten-free version and our usual ones.

wingnite3

wingnite2

wingnite

Pub-Style Chicken Wings

4 lbs chicken wings, split and tips discarded
1 cup flour (or rice flour)
1 tbsp salt
1/2 tbsp pepper
1 tsp garlic powder
1/2 tsp paprika

Bring a large pot of water to boil. Drop in chicken wings (still frozen is fine), bring back to a boil, reduce heat and cook for 8 minutes. Drain and set aside.

Combine flour and seasonings in a large bowl. In small batches, dredge the cooked chicken wings in seasoned flour.

To bake the wings, place the dredged wings on a greased baking sheet. Spray all over with a cooking oil spray (like Pam) and bake at 425F until crispy and golden brown, about 30-40 minutes.

To fry the wings, heat a couple inches of a light oil (such as canola) to 375F in a wide, heavy-bottomed pot over medium-high heat, or use a deep-fryer set to 375F (or the closest setting). Fry the wings in small batches for 8-10 minutes, then skim them out and place them on a paper towel-lined baking sheet in a 200F oven to keep warm. Repeat with remaining wings.

For dry-seasoned wings (salt & pepper, lemon pepper, etc) - sprinkle the wings with a generous amount of your seasoning of choice. For saucy wings (hot, teriyaki, etc), place the wings in a bowl with a lid, add some sauce, cover and toss gently to coat.

Serve with ranch and/or blue cheese dressing for dipping!

Tuesday, November 23, 2010

Cream of Mushroom Soup

Yep, I'm on a soup kick. I love soup. I love creamy soups. I love brothy soups. I love meaty soups, and soups chock full of vegetables. Really, if it's soup, I will probably give it a try. And I especially love soup now that winter is in full swing here. With all the cold days we've had recently, it's so nice to have a pot of soup on for my husband when he gets home from work. I don't think he loved this one quite as much as I did, but I will admit to fully embracing the joy of cooking with fungus. He, on the other hand, is a little more wary of our little fungi friends, but is slowly coming around. This soup definitely gave him a greater appreciation for the depth of flavour that a bowl full of mushrooms has.

You can also used dried mushrooms in this, substituting 3oz of dried mushrooms for every pound of fresh called for in the recipe. Simply soak them in warm water for an hour beforehand. For extra flavour, run the soaking water through a fine-mesh sieve and substitute for some of the broth.

mushroomsoup

Cream of Mushroom Soup
(Adapted from Michael Smith's The Best of Chef At Home)

1/2 cup butter
1 lb button mushrooms
1 lb "other" mushrooms (I used shiitake & oyster)
2 medium onions, diced
salt & pepper
1 1/2 cups red wine
5 cups chicken or vegetable broth
1 cup heavy cream
1 1/2 tsp dried thyme
1 tsp dried rosemary
3 tbsp cornstarch
1/4 cup cold water

Place a large heavy-bottomed pot over medium heat. Add the butter, mushrooms and onions, season with a sprinkle of salt & pepper, and cook until mushrooms begin to brown.

Pour in red wine, and bring to a simmer. Let cook until wine has reduced by about two thirds, and is like a glaze on the mushrooms.

Stir in chicken broth, heavy cream and thyme, and return to a simmer.

Stir together cornstarch & cold water. Add slowly to the simmering soup, stirring while it returns to a simmer. If you prefer a thicker soup, add a little more cornstarch & water. If you like a smoother soup, puree all or part of the soup with an immersion blender.

Add salt & pepper to taste, and serve immediately.

Cream Of Mushroom Soup on FoodistaCream Of Mushroom Soup

Saturday, November 20, 2010

Westernized Bánh mì (Vietnamese Subs)

Several years ago, when my husband worked downtown, he used to go to this crazy little Vietnamese place for lunch all the time, and he raved about their sub sandwiches. Not loving the crazy spicy food, I avoided them until I noticed two restaurants near my office that served these, and both would have lines out the door, even in the dead of winter. I decided to join the masses, and ended up totally hooked on these delicious buns full of satay & vegetables. Now that I'm at home with the kids and my husband no longer works in the downtown core, we set out to figure out how to replicate these subs in our own kitchen, and I think we've come pretty close to the westernized versions that are readily available. It's probably not very authentic, but it's delicious nonetheless!

banhmi2

Westernized Bánh mì (Vietnamese Subs)
Adapted from Chowtown

4 6-8" sub buns
Mayonnaise
Satay beef, chicken or pork
Mozzarella cheese, sliced thin
1/2 of an english cucumber, sliced thin
1/2 a medium onion, sliced thin
Do Chua (pickled carrots & daikon), squeezed in a paper towel to remove excess liquid
Bunch of cilantro
12 fresh red Thai or bird chilis, stems removed
Sriracha hot sauce

Split sub buns and lay open on a baking sheet. Cover bottom portion with satay meat, and cover meat with mozzarella cheese. Place under broiler until bun is toasted and cheese is melty & bubbly.

Spread the top of the bun generously with mayonnaise, and fill with cucumber, onion, do chua, cilantro, and chilis, and finish with a squirt of sriracha. The chilis and sauce are hot, so if you prefer a milder version, feel free to leave them out.

Makes 4 6-8" subs.


Satay Beef, Chicken or Pork

4 tsp peanut oil
1 small onion, finely diced
4-6 cloves garlic, minced
1" piece of ginger, minced
1/3 cup peanut butter
1 cup coconut milk
2 tsp soy sauce
2 tbsp brown sugar
1 1/2 tbsp fish sauce
1 1/2 tbsp lime juice
2 tsp sambal oelek
1 pound thinly sliced beef, chicken or pork

Heat 2 tsp oil in a saucepan over medium heat. Add onion, garlic and ginger and saute until onion begins to brown.

Reduce heat to low, add remaining ingredients and simmer until thick, about 10 minutes. Taste, and add more sambal oelek if you like it spicier. Remove from heat and set aside.

In a large pan, heat another 2 tsp oil over medium heat. Add meat and cook until nicely browned. Add satay sauce, reduce heat and let simmer until the sauce is nice and thick. Remove meat from sauce with a slotted spoon and set aside.


Do Chua (Sweet Pickled Carrot & Daikon)

3/4 lb carrots, peeled & trimmed
3/4 lb daikon, peeled & trimmed
1 tsp salt
2 tsp + 1/2 cup sugar
1 1/4 cups rice vinegar
1 cup lukewarm water

Cut carrots & daikon into matchstick-sized pieces. Place in a bowl with salt and 2 tsp sugar. Knead gently for 3-4 minutes, until the carrots & daikon begin to release a significant amount of moisture and lose about a quarter of their volume.

Combine 1/2 cup sugar, vinegar and water in a bowl. Stir to dissolve sugar.

Rinse carrot & daikon under cool water in a colander, and gently press out excess moisture. Return to a bowl and pour the vinegar mixture over top. Let marinate a minimum of 1 hour, but this may be made ahead and refrigerated for up to a month.

Wednesday, November 17, 2010

Maple Pecan Pumpkin Loaf with Brown Butter Bourbon Glaze

I was digging around in the freezer and found a 2-cup package of frozen pumpkin puree left over from making pumpkin cheesecake a few weeks ago, and was inspired to find something new to do with it. I had been craving banana bread but had no bananas, so decided to see what I could do with pumpkin. And what better to add to the lovely fall flavour but maple syrup? This loaf is a little dense but has a lovely moist crumb. A glaze made with nutty brown butter and bourbon makes a perfect finishing touch.

maplepumpkinloaf3

maplepumpkinloaf

maplepumpkinloaf2

Maple Pecan Pumpkin Loaf with Brown Butter Bourbon Glaze

Loaves:
2 cups all purpose flour
1 cup whole wheat flour
2 tsp cinnamon
1 tsp nutmeg
1/2 tsp salt
1 tsp baking soda
1 tsp baking powder
1 cup butter, partially melted
1 cup brown sugar
1 1/4 cups white sugar
1/3 cup real maple syrup
3 eggs
2 cups pumpkin puree (1 15oz can)
1 cup coarsely chopped pecans

Glaze:
1/4 cup butter
1 1/2 cups icing sugar
2 tsp bourbon
2 tbsp milk

Preheat oven to 350F and grease two 9x5 loaf pans.

In a medium bowl, combine flours, cinnamon, nutmeg, salt, baking powder and baking soda. Set aside.

Microwave butter for a few seconds to partially melt it. Pour into the bowl of a stand mixer and cream with sugars, maple syrup and eggs. Stir in pumpkin.

Slowly add dry ingredients to the pumpkin mixture, stirring until just combined. Fold in pecans, and divide batter between the prepared loaf pans. Bake at 350F until a toothpick inserted in the middle comes out clean, about 45-50 minutes. Let cool in pan for 10 minutes, then remove to a wire rack.

To make the glaze, measure icing sugar into a medium bowl.

Hat butter in a small saucepan until bubbly and golden brown. Watch the butter closely and remove from heat when it's done, it goes from golden to burnt pretty quickly.

Pour butter over icing sugar, and add bourbon and milk. Stir until smooth, and drizzle over pumpkin loaves.

Makes 2 loaves.

Sunday, November 14, 2010

Smoky Black Bean & Sausage Soup

Cooking with dried beans has become my most recent kitchen obsession. They're cheaper than canned beans, less wasteful, and don't come laden with sodium. Cooking with dried beans takes a little more planning and effort than just opening a can and dumping it in the pot, but the results are tastier.

This soup is a lovely, meaty, hearty soup, perfect for a chilly day. It has a nice heat to it but isn't overwhelmingly spicy. According to my spice-loving husband, a dash of hot sauce makes it even better!


blackbeansoup

Smoky Black Bean & Sausage Soup
(adapted from my kitchen addiction)

1 pound dried black beans, soaked overnight and rinsed
1-2 tbsp extra virgin olive oil
10-12 ounces smoked sausage, diced (I used a moose salami for this)
1 medium onion, diced
1 large bell pepper, diced
1 small head garlic, minced
2 jalapeño peppers, seeded and minced
1 tbsp ground cumin
1 tbsp ancho chili powder
1 1/2 tsp Hungarian paprika
Splash of beer or white wine (optional)
6 cups chicken stock
Salt & pepper
Sour cream to garnish

Soak black beans overnight in a generous amount of water. Rinse and set aside.

Heat oil in a large heavy-bottomed pot over medium heat. Add onions, bell peppers and sausage, cook until soft, about 6-8 minutes. Add garlic & jalapeño, stir and cook for another 30 seconds. Add spices, stir to coat. Deglaze your pot with a generous splash of beer or white wine.

Pour in chicken stock & add beans. Bring to a boil, then reduce to a simmer and let cook over low heat for 1h 15m. Test beans for doneness, they should be soft but not falling apart. If they're not done, continue simmering for another 15 minutes or so, testing occasionally.

Partially blend with an immersion blender to thicken the soup. Season with salt & pepper to taste, and serve with a dollop of sour cream.

Serves 6-8

Thursday, November 11, 2010

Perfect Prime Rib

A well-cooked prime rib roast is, in my most humble opinion, one of the finest pieces of beef you will ever eat. It's hard to cook a truly bad prime rib, but it's so easy to cook an amazing one. This is not so much a recipe as it is a guideline - there are no fancy ingredients, no tricky techiques to master. All you really need is an oven and a whole lot of time. A high-heat start gives the roast a nice crisp outside, while roasting for the majority of the cooking time yields a lovely tender roast with an even doneness. Because roasts don't come in standard sizes, and oven temperatures may vary between models, it is absolutely vital to use a meat thermometer to determine when the roast is finished. This roast is best cooked to no more than medium, any more and it's really just a waste of this cut of meat.

perfectprimerib

Perfect Prime Rib

Prime rib roast of your desired size
Sea salt
Freshly cracked pepper
Herb rub of choice
2 carrots
1 large onion

When choosing a roast, a good guess is to estimate that you can feed 2 people per rib. A 3-rib roast would easily serve 6 adults. Ask your butcher for the 'small' end of the prime rib if you ca, but as I said above, a bad prime rib is hard to come by. I have cooked both ends and found that they're both delicious!

A couple hours before roasting, remove the roast from the fridge and allow it to come to room temperature. Rub the meat all over with herbs. My rub of choice consists of rosemary, thyme, sage, basil and oregano. You can use fresh if you'd like, but I keep this dried herb blend on hand for various seasoning purposes, and find it's perfect for this. Just before cooking, season with salt & pepper.

Preheat your oven to 450F. Scrub your carrots and remove the ends, no need to peel. Cut them into a couple large pieces. Trim & peel the onion, cut it into quarters. Scatter the carrot & onion pieces in the bottom of a roasting pan, and lay the roast, rib side down, on top of them. If you have a remote meat thermometer, now is a good time to place the probe in a good position to monitor the internal temperature.

Place the roast in the oven and roast at 450F for 15 minutes. Without opening the oven door, turn the oven down to 250F, and continue to roast for 20-25 minutes per pound, until the roast reaches an internal temperature of 130F for medium rare. If you like your meat done a little more, roast to 140F for medium.

When the roast is done, cover it with aluminum foil and a kitchen towel to allow it to rest. It's important to allow the roast to rest for at least 20-30 minutes before carving.

If a jus or gravy is your thing, move the roast to a board for carving. Remove the carrot & onion pieces from the pan, and heat the drippings over medium heat. Deglaze the pan with a splash of red wine and, if necessary, supplement the drippings with beef stock. For a thick gravy, bring to a simmer and thicken with a couple tablespoons of cornstarch dissolved in a bit of cold water. You may find, however, that this roast rarely releases enough drippings to make a jus or gravy without supplementation. This is not a bad thing, it just means all those delicious meaty juices are still inside your roast!

Sunday, November 7, 2010

Roasted Butternut Squash & Pear Soup

It's November, and fall always makes me think of warm, hearty, delicious comfort food. For me, there's nothing more comforting than a bowl of thick, creamy squash soup. I actually made this soup several weeks ago before the birth of my son. We enjoyed half the batch immediately, and froze a liter of it for a quick dinner after he was born. I am pleased to say that not only is this recipe fantastic right out of the pot, but it freezes beautifully. Simply freeze before adding cream, and when you want to enjoy it again, let it thaw, heat gently in a saucepan over medium heat, garnish and dig in!

roastedsquassoup

Roasted Butternut Squash & Pear Soup
(Adapted from The Gracious Bowl)

2 tbsp olive oil
1 large onion, diced
1 medium butternut squash, quartered and seeded
3 pears, peeled and chopped
1 tsp madras curry powder
1 tsp powdered ginger
1/2 tsp cinnamon
1/2 tsp salt
pepper to taste
2-3 cups chicken broth (or vegetable broth)
Cream, salt & pepper for garnish

Quarter and seed the squash, rub with olive oil, sprinkle with salt and pepper, and roast at 400 degrees until soft, about 30-40 minutes. Let cool and scoop out the flesh. Set aside.

Heat olive oil over medium heat. Saute the onion and pear until very soft, 6-8 minutes. Add the curry, cinnamon, and ginger and let them toast for a minute, then add the squash. Add the chicken broth, and simmer for another 10-15 minutes

Puree the soup in a blender in small batches, or with an immersion blender. If the soup seems too thick to puree well, add a little more broth to loosen it up. This is a pretty thick soup, so if you like it thinner, just add broth until it's the consistency you like.

Ladle into bowls, stir in cream (a tablespoon or two per bowl is good), garnish with salt & pepper, and enjoy!

Serves 4-6.

Wednesday, September 22, 2010

Spelt Zucchini Carrot Mini Muffins

Monday was my turn to provide snacks for my daughter's preschool class, and I couldn't think of anything more appropriate for a group of 3-4 year olds than a nice fresh batch of mini muffins. My kid will eat anything baked into miniature muffin form, and these are no exception. They passed the preschooler test with her devouring four and asking for more! The best part about these muffins is that they're chock full of healthy goodness, with shredded veggies, raisins and half spelt flour! And unlike many of my failed whole wheat muffin experiments, which turned out dry, bland and not very appetizing, these muffins are sweet, spicy and incredibly moist. Perfect for any lunchbox!

zucchinicarrotmuffins-1

Spelt Zucchini Carrot Mini Muffins

(Adapted from Real Mom Kitchen)

1 cup sugar
1/4 cup canola oil
1 tsp salt
2 large eggs
2 cups grated zucchini
2 cups grated carrots
1/2 cup raisins
1 cup spelt flour (or any whole wheat flour)
1 cup all purpose flour
2 tsp baking powder
2 tsp cinnamon
1/2 tsp ground nutmeg

Preheat your oven to 350°F. Prepare your pan by spraying with a non-stick spray, or lining with muffin cups.

Whisk together the sugar, oil, salt, and egg, stir in the zucchini & carrots.

Whisk together flours, baking powder, cinnamon and nutmeg, then add to the batter. Stir till just combined, then fold in raisins.

Fill prepared muffin cups about 2/3 to 3/4 full. Let the muffins rest for a couple minutes before placing them into the oven.

Bake the muffins until the edges are lightly browned and a toothpick inserted comes out clean, about 12 minutes for mini muffins, 20-25 minutes for regular-sized muffins.

Remove the muffins from the oven, and cool them in the pan for 10 minutes; transfer to a rack, and cool. Eat warm, and store the rest in an airtight container!

Yield: About 50 mini muffins, 12-18 regular-sized muffins.

Sunday, September 19, 2010

The Best Lemonade Ever

Fall may be here (or just around the corner), but one thing I'm completely unwilling to let go of is the delicious, refreshing taste of homemade lemonade. Sure, this would be best enjoyed in the sun out on my deck, but just because it's raining and chilly doesn't mean I love it any less.

lemonade-1

The Best Lemonade Ever

8 lemons (~ 1 1/3 cups juice)
Zest 4 lemons
1 1/3 cups water
1 cup sugar
5-6 cups cold water

Wash your lemons, and zest about half of them. If you really feel so inclined you can zest them all!

In a small saucepan, mix together 1 1/3 cups water, 1 cup sugar, and lemon zest. Bring to a simmer to make a simple syrup, remove from heat and let steep for a few minutes.

Juice your lemons. To get them to release their juice more readily, roll the lemons under the palms of your hands, back and forth, until they soften up and feel squishy. Cut and juice.

Strain your juice to remove any seeds, and strain the simple syrup to remove the pieces of zest.

Combine juice, syrup & cold water in a pitcher. Add more water if this is too strong, but I find that 5 cups is just about perfect. Also, if you find this too sour, you can add another 1/3 cup sugar to sweeten it up just a little.

Refrigerate 'til cold, and serve with ice.

Yield: About 7 cups

lemonade-2

Here we go...

Just what the internet needs, another food blog. Right? This bandwagon is one I think would be fun to jump on. I need somewhere to record my kitchen adventures, somewhere other than the sauce-and-butter-stained notebook that has permanent residence on my kitchen island. I'm always pestered by friends to share what I'm up to, so this will be an easier medium than trying to remember who I need to email what to, and an easier place for me to look back for my own use, as I have a tendency to write in chicken-scratch, with pens whose inks are smudged easily by various kitchen liquids.

Most importantly, this blog is dedicated to my grandmother, who taught me to cook as soon as I was tall enough to see over the kitchen counter standing on a chair, and who encouraged me to use recipes as a guide, and not as The Only Way. She taught me the joy of homemade, of experimenting, and I hope that I can share that in everything from simple comfort food to more gourmet fare.
Related Posts Plugin for WordPress, Blogger...