I'm not sure how many people still read this blog, since my updates have been nonexistant for what seems like forever. But for those who may see this pop up in their feed reader, or who check in from time to time, you can find me on my new blog, where I'll be consolidating all things crafty, foodie and photography all in one place.
So please, come on over and visit me at Blissful Domesticity! I promise I'll try harder to keep things interesting over there. :)
Thursday, August 18, 2011
Sunday, February 13, 2011
Super Easy Candy-Coated Popcorn
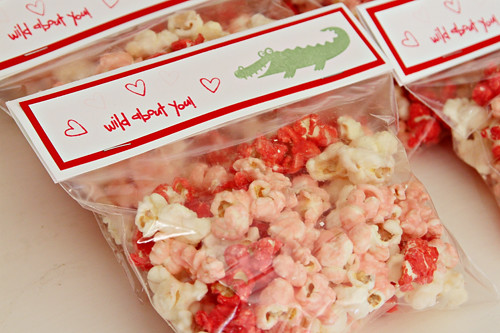
My daughter's preschool class is having a valentine's day party tomorrow. My plan was to send little marshmallow pops for her school friends, but those hopes were dashed last night when the only marshmallows I could find in the house were grotesquely misshapen. There was not a hope in hell that they would look at all good. I resigned myself to just providing little cards for her friends, until I remembered something I'd seen on a blog a few days earlier. This Blessed Nest posted lovely candy-coated popcorn-and-m&ms treat bags. I just so happened to have Wilton candy melts in my pantry in a rainbow of colours, so I adapted her idea a little bit for what I had in my pantry.

Super Easy Candy Coated Popcorn
(adapted from This Blessed Nest)
Popcorn
Candy Melts in desired colours, ~1 oz per generous cup of popped popcorn
Salt (optional)
Pop your popcorn. Place in a large bowl.
In a double boiler or a heatproof bowl over a pot of boiling water, melt candy melts. Drizzle candy melts over popcorn, and toss to coat. Sprinkle a little salt as you toss if you like your popcorn salty & sweet.
Spread popcorn on a parchment-covered baking pan, and let sit for half an hour or so, until candy coating has set. Break apart gently with your hands, since the pieces will have stuck together.

The tags are also homemade - now that my craft area has been reorganized, I was able to find exactly what I needed to make these cute little tags, the perfect size for ziploc sandwich baggies! For my crafty readers, the supplies are all from Stampin' Up - Whisper White & Real Red cardstock, Wild Wasabi, Real Red & Pink Pirouette ink, and stamps from Wild About You, and Goody Goody Gumdrops.


Super Easy Candy Coated Popcorn
(adapted from This Blessed Nest)
Popcorn
Candy Melts in desired colours, ~1 oz per generous cup of popped popcorn
Salt (optional)
Pop your popcorn. Place in a large bowl.
In a double boiler or a heatproof bowl over a pot of boiling water, melt candy melts. Drizzle candy melts over popcorn, and toss to coat. Sprinkle a little salt as you toss if you like your popcorn salty & sweet.
Spread popcorn on a parchment-covered baking pan, and let sit for half an hour or so, until candy coating has set. Break apart gently with your hands, since the pieces will have stuck together.

The tags are also homemade - now that my craft area has been reorganized, I was able to find exactly what I needed to make these cute little tags, the perfect size for ziploc sandwich baggies! For my crafty readers, the supplies are all from Stampin' Up - Whisper White & Real Red cardstock, Wild Wasabi, Real Red & Pink Pirouette ink, and stamps from Wild About You, and Goody Goody Gumdrops.

Wednesday, January 26, 2011
Swedish Meatballs
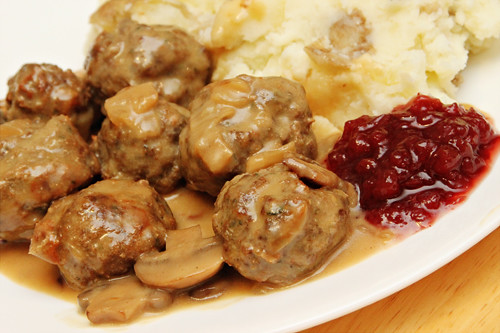
One of my most favourite things to make with ground beef is meatballs. Meatballs are so much fun - add them to pasta, make a sweet chili sauce, cook 'em up with pineapple and peppers in a sweet and sour dish... the possibilities are endless! One of my foodie friends once told me about the amazingness that is the meatballs from the Ikea cafeteria. I was skeptical of how good meatballs at a furniture store could be, but these ones blew me away, especially with the tangy lingonberry sauce. Weeks later, I happened across lingonberry sauce in Superstore and bought it in case I ever had the inclination to recreate the Ikea-style meatballs. Sure enough, the craving hit again, and I ended up making the following recipe. The meatball recipe is now my go-to recipe whenever I want to make a meatball dish - all I do is change the sauce, and sometimes the seasoning. Also, there's an adaptation at the bottom to make these meatballs gluten-free for those in your family who may be sensitive to wheat.

Adapted from Joelen's Culinary Adventures
Meatballs:
2 eggs
1/3 cup cream or milk
5 slices bread, torn into small pieces
1 large onion, finely diced or grated
1/2 tsp nutmeg
1/2 tsp allspice
1/2 tsp garlic powder
2 tbsp dried parsley
2 tsp brown sugar
1/4 tsp pepper
1 tsp salt
1 tsp baking powder
1 lb ground pork
1 lb ground beef
Sauce:
1/4 cup + 2 tbsp butter, divided
1 tbsp olive oil
1 lb button mushrooms, sliced
salt & pepper
2 tbsp water
1/4 cup flour
1 1/2 cups chicken broth
1 1/2 cups beef broth
2 tbs brown sugar
1/3 cup cream
1 tbs apple cider vinegar
In a small bowl, whisk together eggs and cream. Stir in bread and set aside.
In a large bowl, combine grated onion, spices, sugar, baking powder and ground pork and mix well. If you're not squeamish, now is a good time to get in there with your hands.
Mash bread mixture with a fork until no large bread chunks remain. Add to the pork and mix until well combined, then add beef and mix in thoroughly.
Form into 1-1.5" meatballs with wet hands or a small ice cream scoop - should make 48 meatballs.
Place meatballs on a greased baking sheet, or in the wells of a greased mini muffin pan, and bake at 350F for 25 minutes. Remove from oven and set aside.
In a wide-bottomed, heavy saucepan with a tight-fitting lid, melt together olive oil and 2 tbsp butter over medium high heat. Add mushrooms, season with salt & pepper, and water - stir and cover with lid. Let cook 3-4 minutes, stirring occasionally.
Remove lid, lower heat and allow mushrooms to continue cooking, stirring often, until liquid has evaporated and mushrooms are a lovely golden brown all over and are nicely caramelized. Deglaze pan with a splash of white wine or water, cook until liquid has evaporated, and remove mushrooms to a bowl. Set aside.
In the same saucepan, melt 1/4 cup butter over medium high heat until sizzling. Add flour and whisk together to make a roux. Whisk constantly until mixture is a light golden brown, then whisk in broths. Stir in mushrooms & sugar, bring to a simmer and allow to reduce until nice and thick. Stir in cream and reduce heat to medium.
Add meatballs to the sauce, and simmer until heated through. Stir in vinegar and serve.
Serves 6-8
To make gluten-free, cook 1 cup of brown rice in 1.5 cups water. Omit milk but soak cooked rice with egg as per directions above. Mash and proceed with the recipe as usual.
Saturday, January 1, 2011
I've been a bad blogger...
I've been bad. I started this food blog with the intention of sharing at least one recipe a week, and I seemed to have dropped that ball back around the middle of December with the Christmas rush. I had high hopes but not much time, unfortunately. However, it's a new year, and I'm going to do my best to bust out some of the things I've been working on in my wee kitchen. I've been playing with some fun new ingredients, like red quinoa and black rice. I can't wait to share some of these delicious flavours with you all, and I'm working on getting something up by the end of the week to tempt your tastebuds.
Happy 2011, my friends, and happy eating!
Happy 2011, my friends, and happy eating!
Subscribe to:
Posts (Atom)
